Posted on

Using 3D Printed Interlocking Metals Was A Design Challenge

Silver Gimmel Ring - Interlocking Metals

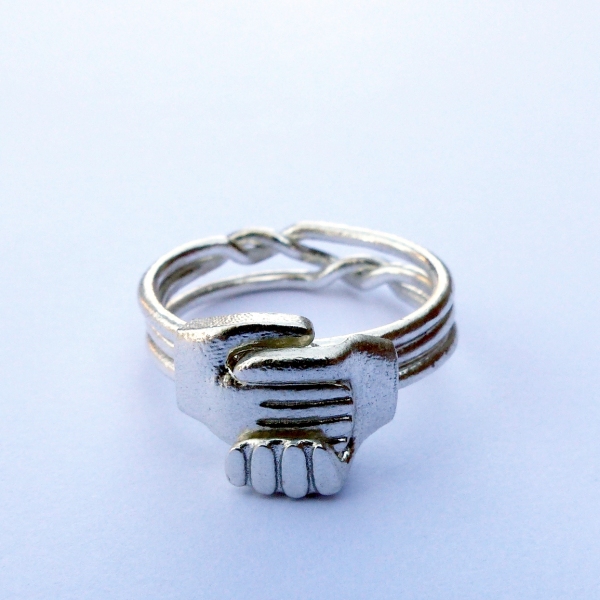
This new ring launched last week but it took a few iterations to get it right. This was my first design using Shapeways’ 3D printed interlocking metals. The Gimmel Ring is a puzzle ring that has three separate bands. There is a heart on the center band. The top and bottom bands each have a hand. They loop together like links in a chain. When you arrange them correctly the two hands clasp the heart.

The Design

Shapeways’ design rule when using 3D printed interlocking metals says that the different parts have to be at least 1mm apart. This posed a challenge with this ring. The parts would have to be closer than 1mm for them to fit together snugly. On the other hand, if the pieces were too close together, they may not fit together at all. So first I designed the three pieces together to make sure the clearances were tight. In this case, I made them only about 0.2 to 0.3mm apart when fit together. The tolerances on these kind of parts are around that range, so I figured it would be close. The plan was if my initial prototype did not fit together, I would at least know what areas were too tight and could redesign them.

After designing the three pieces together, I then separated them in the 3D model. I tried to separate them in a way that they would still go together, but were spaced apart more than 1mm. The first time I did this, I was not smart enough to put my own puzzle together.

The Prototypes

Gimmel Ring with the bands separated

After I got the first prototype, the three pieces would not go together. I did not put one of the puzzle pieces together correctly. I figured out which band looped incorrectly, and I cut it and then put it together correctly. Thankfully, the hands and heart fit together very nicely after looping the bands together correctly. So it was just the one band that I needed to fix in the model. With that error correct, I ordered a second prototype.

The was a problem with the second prototype too, but this one was not my fault. The ring was defective when I got it. One of the bands was warped and bent. It looked like something damaged it after being made. I tried to bend the band back into shape, but it broke. I sent pictures of the defect to Shapeways. They saw the defect and agreed to make a replacement.

The third prototype was a charm. It had no defects and all pieces fit together perfectly. I intended this prototype to be a size 5. I normally design small sizes first. Those are normally the hardest to make. If Shapeways can make a small ring, odds are they can make a larger ring, too. It is common for rings to measure a bit small. Even though I intended this one to be a size 5, it measured only size 4.75. So I took this quarter size into account in the next version. I had selected bronze for these first three prototypes. Now that I had a proven concept, I ordered a size 8 in silver. That one also came out perfect and measured the correct size.

What’s Next?

Now that I have some design experience with these interlocking metals and puzzle rings, I plan to try some other ideas. I would like to do a puzzle ring version of a Claddagh Ring. There are some other ideas I may keep to myself for now. Stay tuned.

Posted on

New: Four-Point Celtic Knot Pendant Design

Amulet of Mara Celtic Necklace

I got a request from a customer to create a pendant that they were unable to find anywhere else. They had a photo of a similar four-point Celtic knot pendant, but it was not in silver. They found me through Shapeways’ Designers For Hire project. They chose me because they had seen that I had created similar pendants already.

Designing The Pendant

This was a challenging piece for a couple reasons. First, they wanted a gem in the center. I have not worked much with gems, although it is something I want to practice and learn. Second, they wanted the piece to be only slightly bigger in diameter than a quarter. Cramming the details into that small of a space would be a challenge. Third, it had a series of four infinity knots that had to be at a lower depth than the four main points that were out front.

After studying the picture I created an initial version of the design with Blender. I knew the first version was not perfect, but I uploaded it to Shapeways anyway. This allowed me to use their model checking tools to see what areas might have problems. I found that some of the details were were being treated as “walls” which were too thin to be made with 3D printing. To address those issues I put a “backing” on the thin wires that come out of the outside of the circle. This basically made it so they would be treated as details coming off of a wall. “Details” have a different set of design guidelines than “walls”. Making the piece larger also helped, so that I could make everything a bit thicker and easier to 3D print.

The customer had picked out a 5mm diameter cabochon to put in the center, and the initial version did not have quite enough space in the center for it. So that was another reason to make the pendant a bit larger. With those things in mind I created a second version of the pendant. This time it passed Shapeways’ model checks. I then shared pictures with the customer to make sure they liked the design. Once they gave their approval, I ordered the piece in silver. I already had the cabochon on hand, so when the pendant arrived I was able to put everything together.

The Final Product

Overall I’m happy with how it turned out. I had done a design or two before with a four-point Celtic knot, but what makes this piece really eye-catching are the four infinity knots that are in the background. Those really add another level of complexity to the design.

After doing this, I’m interested in doing more designs with gems and especially cabochons now. The cabohon was easy to work with since it has a flat back. They are much easier to mount than a princess cut gem would be, for example.

One minor problem is that the prongs for the cabochon got polished down so they were shorter than I had hoped. I had planned to use glue to mount the gem anyway, in addition to the prongs. So, the prongs are not doing much to hold the cabochon, but they did locate it nicely in the center of the pendant.

Meaning Of A Four-Point Celtic Knot

I’m not sure if this symbol has any special meaning to the customer, but a four-point Celtic knot can symbolize a few different things. It could symbolize:

  • The four directions North, South, East, West (in fact the piece looks a bit like a compass)
  • The four seasons (Spring, Summer, Fall, Winter)
  • The four ancient elements (Earth, fire, wind, water)
  • The four phases of life (birth, growth, death and transformation)
Posted on

Five Ways a Beginner Can Get Into 3D Printing

3D Printed Pair Of Pliers
A customized pair of pliers I made with 3D printing for a customer

If you want to learn about 3D printing, try it out or even get a product made, it’s never been easier. There are some limitations but for the most part you can create any shape you can think of with 3D printing, and in some cases even create interlocking parts. This is what makes 3D printing so amazing (and addictive). Here are five ways you can get started:

1. Use a 3D printing service like Shapeways

Shapeways is the best one in my opinion but there are others like Kraftwurx and i.Materialise. All of them are pretty similar. You need to have a CAD model that you upload to their site. Then you can order the model in a number of different materials. Small plastic prints will only run a few dollars plus shipping. Larger prints will cost more. They also offer many metals, including some precious metals. Those can run anywhere from around $10 up into the hundreds of dollars. It all depends on the size and metal that is chosen.

Shapeways also is great because they have a model checker. After you upload a file, it will show you exactly where the problem areas are. This way you can go back and redesign your item without ordering to find out later that they couldn’t make it, or worse, get a print sent to you that did not turn out correctly.

2. Easy Creator Apps

There are several “Easy Creator” apps on Shapeways’ web site and there are others out there as well such as Monstermatic. These allow you to customize or create a 3D model without needing to know any CAD software. The 2D to 3D print creator takes a black and white 2D image and simply extrudes it into a third dimension to give it depth. If you know how to use any kind of graphics software, you can use this app to make it into a 3D print. With that one it will even change the depth of the print depending on the shade of gray. There are several others you can look at here.

3. Hire a designer

If what you are trying to make is too complicated to be made with any of the Easy Creator apps, then you could hire a designer to create the 3D model for you. There are a few ways you could do this. You could post a listing to a freelance hiring service such as Elance or Upwork. These are global services and you can usually find someone who will do the work for a reasonable price. You could also look in the Shapeways forums sections dedicated to linking designers with people who need something designed.

4. Use the Thingiverse

The Thingiverse may already have a 3D model of the item you want. This is a place people can share 3D models. You are free to download them and modify them. However, if you are planning to make a product from it for sale, that is frowned upon. It is meant to be more of a forum for makers and tinkerers. That’s perfect though for someone just starting out.

5. Learn a simple CAD program like Sketchup or OnShape

There are a ton of different free CAD programs out there. I use Blender to create my 3D printed jewelry. That one will take some time to learn, but there are a ton of good Youtube tutorials showing you how to use Blender, which is how I learned. Programs like Sketchup or OnShape are much easier to pick up for a beginner. Search Youtube to find tutorials for those as well. More advanced programs like Blender will have more features than Sketchup but the simple ones work just fine when you are starting out. You can also download files from the Thingiverse, bring them into Sketchup and then modify them.

Posted on

New 3D Printing Service Matter.io

Leaf Pendant

I try to stay to keep up with the developments going on in 3D printing. There is so much going on it’s hard to keep track. Some time last year I had read about a new 3D printing service coming out called Matter.io. I signed up for their email list and then forgot about it. In November I finally got an email from them. It was an invitation to try out the service. They were looking for small batch jewelry makers to try out their service on a “beta” basis.

The first thing they suggested that I try was this pricing estimator. I tried the version where you don’t have to upload a model or create an account. The estimate is based on the size and weight you enter. I put in the estimated size and weight of one of my models. The estimate that came back was quite high compared to what I get from other services. So I emailed them and asked about it. They responded quickly. They were surprised that I felt the price was high, and said their pricing should be in-line with competition. So I tried again. This time I then created an account and uploaded one of my models to get a more accurate estimate. This time the price was much more in line expectations.

I started looking at the materials they offer. They offer bronze, sterling silver, yellow brass and white brass. They offer several secondary finishes to these as well: matte finish, tumble finish, or mirror polish finish. Finally, you can also have these metals treated or plated at the end. The options there are oxidation, Rhodium-plated, Black Rhodium, Gold-plated or Rose-gold plated. Some of these options are very intriguing, and ones I haven’t seen elsewhere.

I ordered my Celtic Knot Leaf Pendant model in the white brass material. My customers normally prefer the white- or silver-colored metals better than the gold-colored. I ordered it in the “mirror-polished” finish. You can see the result in the picture. At the time of ordering, you also have the option of getting a volume discount. If you order 10 pieces, you can save 16% per item. If you go up to just 14 pieces, you could save 20% per piece. It goes up from there. This is a very nice feature. I’m not quite ready to order in large quantities yet. Someday!

I placed my order on December 16. The confirmation email said I would get my shipment by December 26! This was incredibly fast, especially during the holiday season. I’d have been surprised if they had met that date (they didn’t – more on that later). I got an email on the 17th that my design had been approved. They must do some kind of manual model check to review printability.

Matter.io was unable to meet the December 26 delivery date, which was no surprise. I got an email on January 2 apologizing for the delay and offering 10% off my next order. They said the new estimated delivery date was January 8th. Unfortunately, they were not able to meet this date either. Now I was starting to get a bit nervous. I wondered if there was a problem with my model. I emailed them on January 13 but did not get a response. Finally, I got an automated email on January 16 that my order had shipped! It finally arrived today, January 23. In all, it took 5 weeks from the time I placed my order to the time it shipped. This is not bad at all for a service in Beta testing, and for a brass object with secondary operations done to it (polishing). Until they work out the kinks and get their processes done faster, they should simply adjust their estimated ship date a bit.

Another feature they offer which I have not yet explored is design services. They have a feature where you can upload pictures of an object, and they will create a model from that. You need to take four pictures – a front view, side view, back view and an isometric view. The object has to be on a white background, so it can’t just be anything. This may be something I have to try out in the future.

Overall I am very happy with the way the pendant turned out. This is definitely a service I will give serious consideration in the future for my orders.

In summary, here are the things which makes Matter.io a bit unique from other services:

  • Volume discounts. This could be a a game-changer.
  • Unique materials and finishes. I have not seen some of these offered by other 3D printing services. Two examples are Rhodium plating and white brass.
  • Create a model from pictures. You don’t need to know how to use CAD to create a 3D printable object.

Matter.io links:

Posted on

D&O Designs featured on Printing Everyday Podcast

Printing Everday
Printing Everday
Printing Everday

Recently I was interviewed by Jessica Hedstrom who is starting a new web site called Printing Everyday. She is interviewing a number of Shpaeways shop owners and others using 3D printing to teach people about 3D printing and how it is used. It was a real pleasure talking with Jessica, and I wish her luck in starting up her new site.

Link to the interview at Printing Everyday:

Dan Foley of D&O Designs Printing Everyday Podcast Episode 7

Or you can stream the audio here: