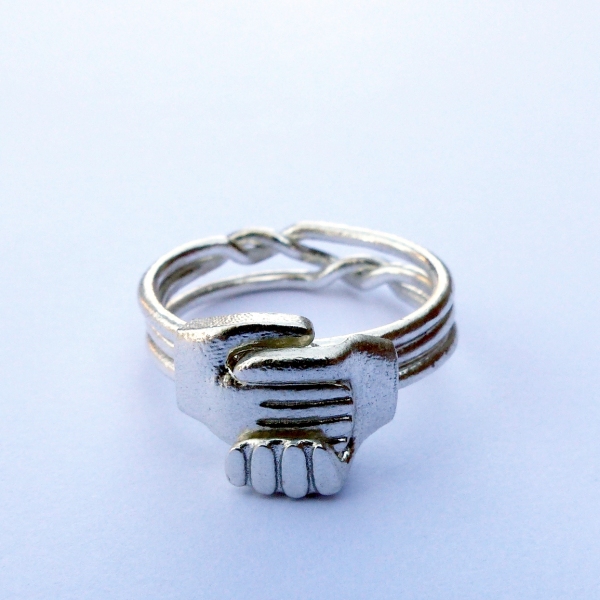
This new ring launched last week but it took a few iterations to get it right. This was my first design using Shapeways’ 3D printed interlocking metals. The Gimmel Ring is a puzzle ring that has three separate bands. There is a heart on the center band. The top and bottom bands each have a hand. They loop together like links in a chain. When you arrange them correctly the two hands clasp the heart.
The Design
Shapeways’ design rule when using 3D printed interlocking metals says that the different parts have to be at least 1mm apart. This posed a challenge with this ring. The parts would have to be closer than 1mm for them to fit together snugly. On the other hand, if the pieces were too close together, they may not fit together at all. So first I designed the three pieces together to make sure the clearances were tight. In this case, I made them only about 0.2 to 0.3mm apart when fit together. The tolerances on these kind of parts are around that range, so I figured it would be close. The plan was if my initial prototype did not fit together, I would at least know what areas were too tight and could redesign them.
After designing the three pieces together, I then separated them in the 3D model. I tried to separate them in a way that they would still go together, but were spaced apart more than 1mm. The first time I did this, I was not smart enough to put my own puzzle together.
The Prototypes

After I got the first prototype, the three pieces would not go together. I did not put one of the puzzle pieces together correctly. I figured out which band looped incorrectly, and I cut it and then put it together correctly. Thankfully, the hands and heart fit together very nicely after looping the bands together correctly. So it was just the one band that I needed to fix in the model. With that error correct, I ordered a second prototype.
The was a problem with the second prototype too, but this one was not my fault. The ring was defective when I got it. One of the bands was warped and bent. It looked like something damaged it after being made. I tried to bend the band back into shape, but it broke. I sent pictures of the defect to Shapeways. They saw the defect and agreed to make a replacement.
The third prototype was a charm. It had no defects and all pieces fit together perfectly. I intended this prototype to be a size 5. I normally design small sizes first. Those are normally the hardest to make. If Shapeways can make a small ring, odds are they can make a larger ring, too. It is common for rings to measure a bit small. Even though I intended this one to be a size 5, it measured only size 4.75. So I took this quarter size into account in the next version. I had selected bronze for these first three prototypes. Now that I had a proven concept, I ordered a size 8 in silver. That one also came out perfect and measured the correct size.
What’s Next?
Now that I have some design experience with these interlocking metals and puzzle rings, I plan to try some other ideas. I would like to do a puzzle ring version of a Claddagh Ring. There are some other ideas I may keep to myself for now. Stay tuned.


