Recently, a customer contacted me on Etsy who wanted a custom design. He wanted a platinum Mother-Child Knot Necklace. His wife inherited a diamond ring. He wanted to take the diamond from the old ring and mount it into a pendant. He saw my version of the Mother-Child Knot Necklace with birthstones on Etsy, and wanted a version of it with the diamond in the center.
The Design of the Platinum Mother-Child Knot
Up to now, I had not designed anything with prongs. I wanted to be cautious about this because he also wanted the pendant made from platinum. Therefore, the pendant would cost quite a bit. Because of the expense, there was no room for error.
First, I had to figure out how to design the prongs. The customer got me the basic dimensions of the diamond. I took that information and created a rough 3D model of the diamond. Then I got a tip from a fellow designer on Shapeways. He recommended I check out a web site called Wizegem. From that, I got a prong model from that was very close to the correct size. I then downloaded it and brought it into Blender, and scaled it a little bit to make it the exact size I needed.
At that point, I shared screenshots of the first attempt with the customer to see if it looked like what he had hoped. He requested a couple minor changes. Once those were done, we ordered a plastic version of the pendant and it was sent it to him. He verified that the diamond fit in the prongs perfectly. Finally, we placed the order for the platinum version.
The Finished Product
The version in the picture attached to this post does not have the actual diamond. It has a Swarovski crystal, which is a bit smaller than the real diamond will be. I placed it there just to give an idea of what it will look like when it is all done.
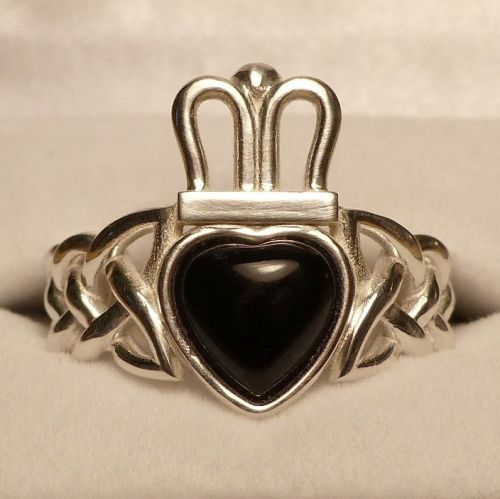
Back in May, I got a request from a customer on Etsy to create am Onyx Claddagh Ring. It would be a Claddagh ring with Celtic knots on either side of a heart-shaped Onyx stone in the center. At that time, I was just starting to experiment with mounting stones or gems to my jewelry. I decided to take on the project knowing that if I messed up it could be expensive, but it would also be a learning experience.
First Version Of The Onyx Claddagh Ring
The first version of the Onyx Claddagh Ring
The customer had an old ring that had broken. They wanted the new one to be similar to that one, but with some changes. Based on the pictures she sent, I estimated the gem to be 6mm tall. So I designed a ring with a place for a gem that size and ordered a 6mm Onyx gem from Africa Gems. When the design was done, I ordered a plastic prototype and had it sent to the customer. I also received a plastic version myself so I could take a look at it and make sure the gem fit the mounting correctly.
It turned out that I had underestimated the size of the gem by quite a bit! The customer got their plastic prototype and explained that it needed to be a lot bigger. After that, they sent me an impression of the old ring so I could compare it. I was able to measure the impression and get much better dimensions. I made another version, this time for one with a 10mm gem.
Second Version
Second version of the Onyx Claddagh Ring
So I redesigned the ring for a 10mm gem. At the same time I ordered the new 10mm gem. We had another plastic prototype made and this one was much closer to what they were looking for. I again got a plastic prototype for myself, too. This allowed me to verify that I liked the appearance and that the gem would be a good fit into the area that I designed for it to mount. The gem ended It eneded up being a very good fit. I only had to make two minor changes to it. The “crown” part of the ring was a bit thin compared to the rest of the ring. So I made the crown a bit thicker to match the rest of the ring. I also reduced the ring size a bit. The customer said the last plastic version they received was a a little bit too big. Once those changes were done, I ordered the final silver version.
Final Silver Version
I just got the silver version this week. I’m very pleased with how it turned out. The gem is a very good fit. I shared pictures of it with the customer and they also liked it. I shipped it to them and they should have it shortly.
With the iterations we went through, the whole process took about four months! We started it in late May and finally completed it here in late September. It took me some time to design each version, and then each time we order prototypes, it took about 2 weeks for them to arrive. So 6 weeks of that time was just waiting on the three different versions to arrive.
The platic prototypes though were key because they allowed us to make changes to make sure the customer got exactly what they wanted, and that the ring was the correct size. Plastic prototypes are only a few dollars plus shipping, so they are well worth it. Thankfully, the customer was very understanding since this was a pretty challenging project.
Silver Version of the Onyx Claddagh Ring
After this experience, I decided to make new versions of my own Claddagh rings with crystals. I should have my first prototype of one of those soon. If all goes well, I hope to make them available for ordering soon.
The Claddagh Ring has been around for hundreds of years. About halfway down this page is an explanation of the meaning behind the Claddagh symbol.
Contact me if you would like to order your own version of this Onyx ring.
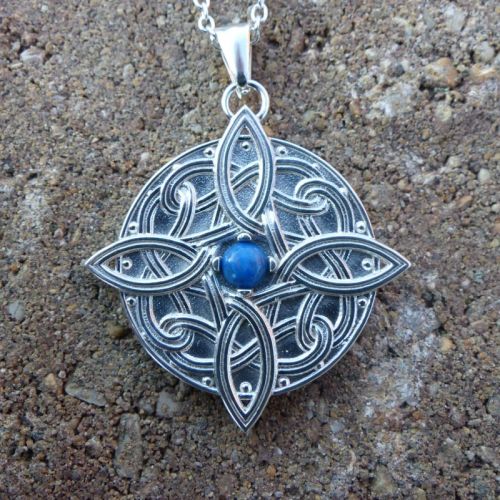
I got a request from a customer to create a pendant that they were unable to find anywhere else. They had a photo of a similar four-point Celtic knot pendant, but it was not in silver. They found me through Shapeways’ Designers For Hire project. They chose me because they had seen that I had created similar pendants already.
Designing The Pendant
This was a challenging piece for a couple reasons. First, they wanted a gem in the center. I have not worked much with gems, although it is something I want to practice and learn. Second, they wanted the piece to be only slightly bigger in diameter than a quarter. Cramming the details into that small of a space would be a challenge. Third, it had a series of four infinity knots that had to be at a lower depth than the four main points that were out front.
After studying the picture I created an initial version of the design with Blender. I knew the first version was not perfect, but I uploaded it to Shapeways anyway. This allowed me to use their model checking tools to see what areas might have problems. I found that some of the details were were being treated as “walls” which were too thin to be made with 3D printing. To address those issues I put a “backing” on the thin wires that come out of the outside of the circle. This basically made it so they would be treated as details coming off of a wall. “Details” have a different set of design guidelines than “walls”. Making the piece larger also helped, so that I could make everything a bit thicker and easier to 3D print.
The customer had picked out a 5mm diameter cabochon to put in the center, and the initial version did not have quite enough space in the center for it. So that was another reason to make the pendant a bit larger. With those things in mind I created a second version of the pendant. This time it passed Shapeways’ model checks. I then shared pictures with the customer to make sure they liked the design. Once they gave their approval, I ordered the piece in silver. I already had the cabochon on hand, so when the pendant arrived I was able to put everything together.
The Final Product
Overall I’m happy with how it turned out. I had done a design or two before with a four-point Celtic knot, but what makes this piece really eye-catching are the four infinity knots that are in the background. Those really add another level of complexity to the design.
After doing this, I’m interested in doing more designs with gems and especially cabochons now. The cabohon was easy to work with since it has a flat back. They are much easier to mount than a princess cut gem would be, for example.
One minor problem is that the prongs for the cabochon got polished down so they were shorter than I had hoped. I had planned to use glue to mount the gem anyway, in addition to the prongs. So, the prongs are not doing much to hold the cabochon, but they did locate it nicely in the center of the pendant.
Meaning Of A Four-Point Celtic Knot
I’m not sure if this symbol has any special meaning to the customer, but a four-point Celtic knot can symbolize a few different things. It could symbolize:
The four directions North, South, East, West (in fact the piece looks a bit like a compass)
The four seasons (Spring, Summer, Fall, Winter)
The four ancient elements (Earth, fire, wind, water)
The four phases of life (birth, growth, death and transformation)